I’m quite a fan of my Sunbeam Torino Link to heading

It looks great and has a lot of solid features like dosed shot buttons, pour timer, pressure gauge, PID adjustable temperature control, quick warmup, strong steam and a full size (58mm) group head.
When the Torino first launched, it did not review well, on CS the response was generally quite brutal… Sunbeam trying to sell it for AUD$2000 put it up against a lot of big names in the industry and people in the know didn’t seem to think it matched up at all.
I guess customers must have thought the same as it did not sell well either. As such, it ended up going on sale, hard. I got mine for a few dollars over AUD$1000.
For that price I think it’s basically a bargain. It was then in competition to a basic Rancilio (like I’d used at work and didn’t love) and similar switch on/off manual machines, or maybe a Breville dual boiler on special which is much larger, much slower to turn on and not that great to look at. I’d previously had the venerable EM6910 from sunbeam and it had been a very solid performer, so decided to stick with the brand.
For an in-depth review from a senior CS member take a look at the posts from noidle22 starting here: https://coffeesnobs.com.au/forum/equipment/brewing-equipment-pointy-end-1500-3000/41806-new-sunbeam-torino-triple-thermoblock?p=588187#post588187
Right from the start I’ve been very happy with it in pretty much every way bar one: the pressure is way too high.
While I don’t know for certain if the pressure gauge on the front is accurate (I don’t have a separate portafilter based gauge), it says my pour pressure is usually 12 - 14 bar if I want a brew time in the 20-30 second range. These shots are typically bitter / overextracted.
This high pressure also results in heaps of channeling, as seen as streams spraying everywhere from a naked portafilter (second hand EM6910 portafilter machined out).
Grinding the coffee courser to reduce the pressure results in a pour time in the 10 - 20 second range with a watery weak drink as a result.
Early on I found the post noting the lack of an Over Pressure Valve (OPV) in the torino: https://coffeesnobs.com.au/brewing-equipment-pointy-end-1500-3000/42322-new-sunbeam-torino-triple-thermoblock-3.html#post569653 as well as mention that modding the machine to add one improved its consistency significantly: https://coffeesnobs.com.au/brewing-equipment-pointy-end-1500-3000/42322-new-sunbeam-torino-triple-thermoblock-3.html#post570264
An OPV, often called a bypass valve, is basically just a pressure relief valve. It has a high pressure side, usually both an inlet and outlet, which connects to the high pressure pump in the machine. There’s a low pressure fitting on the OPV which needs to be plumbed back to the low pressure side of the machine, eg. input of the pump. Any time the pressure on the inlet to the OPV raises above the set level a small amount of water is bled off to the low pressure side, just enough to reduce the pressure back below the desired level.
Not having an OPV is a terrible ommission by Sunbeam, it’s a standard component in many / most espresso machines - especially premium ones. I’m really not sure why they never installed one in the first place, they’re not a particularly expensive or large component. Thankfully, it’s pretty straightforward to install one ourselves!
Parts Needed Link to heading
The high pressure plumbing in the Torino uses a combination of 1/8" BSP fittings and 4mm PTFE (teflon) hose on Jura style connectors.
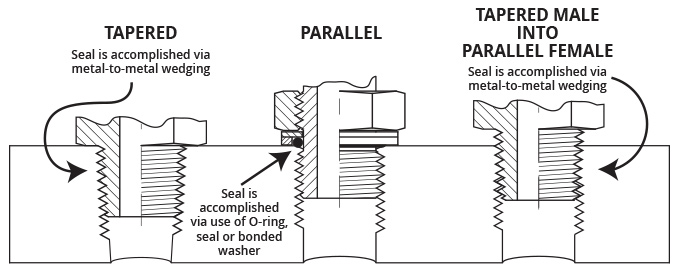
1/8" BSP fittings are very common in industry and espresso machines, however there are two distinct types: 1/8" BSPP (parallel thread) and 1/8" BSPT (tapered thread). Horribly annoying, as many fittings don’t say which they are, though sometimes you can see the taper on the male, sometimes you can see the o-ring (or space for one), other times you just have to guess and hope they seal :-(
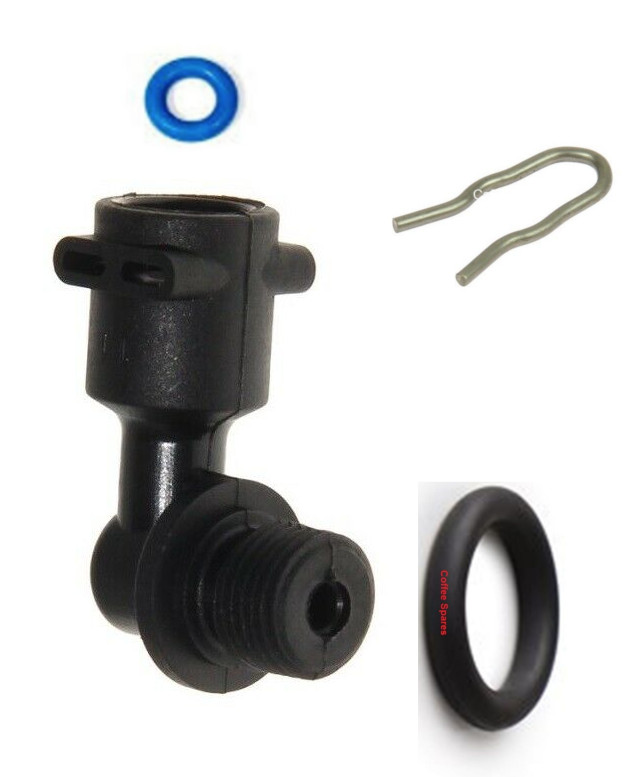
The low pressure side uses silicon tubing and matching push-on fittings. These are typically “secured” with basic cable ties.
OPV / bypass valve Link to heading
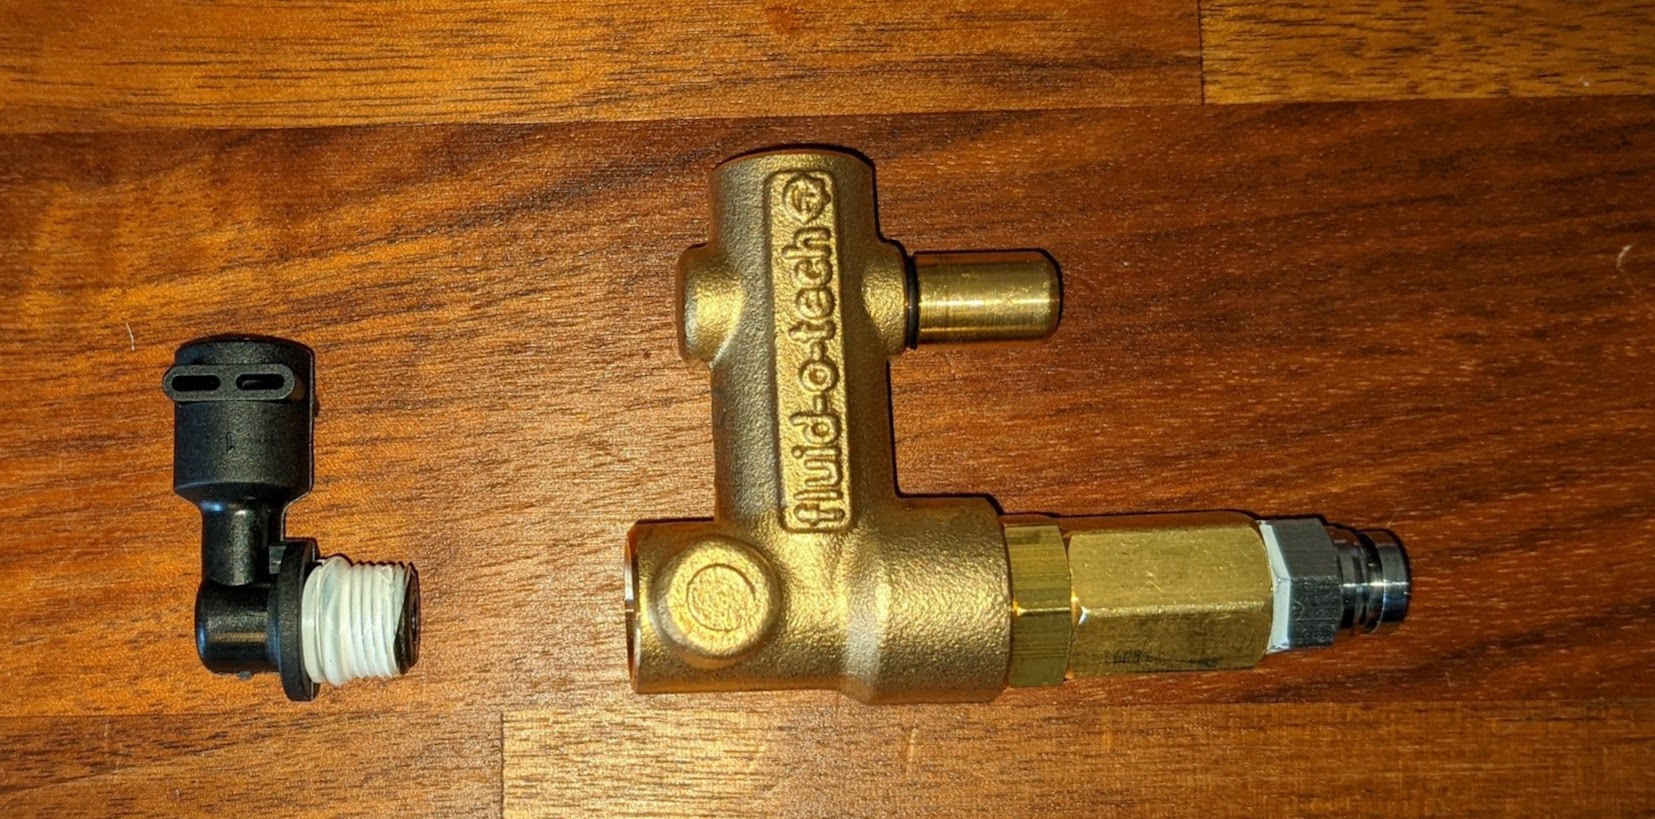
There’s a few different brands / types of these available. I’ve used a Fluid-O-Tech Bypass Valve. This appears to be a premium part for a comparatively low price, however its inlet is a M12x1mm fitting so requires an extra adapter to connect it to the Torino.
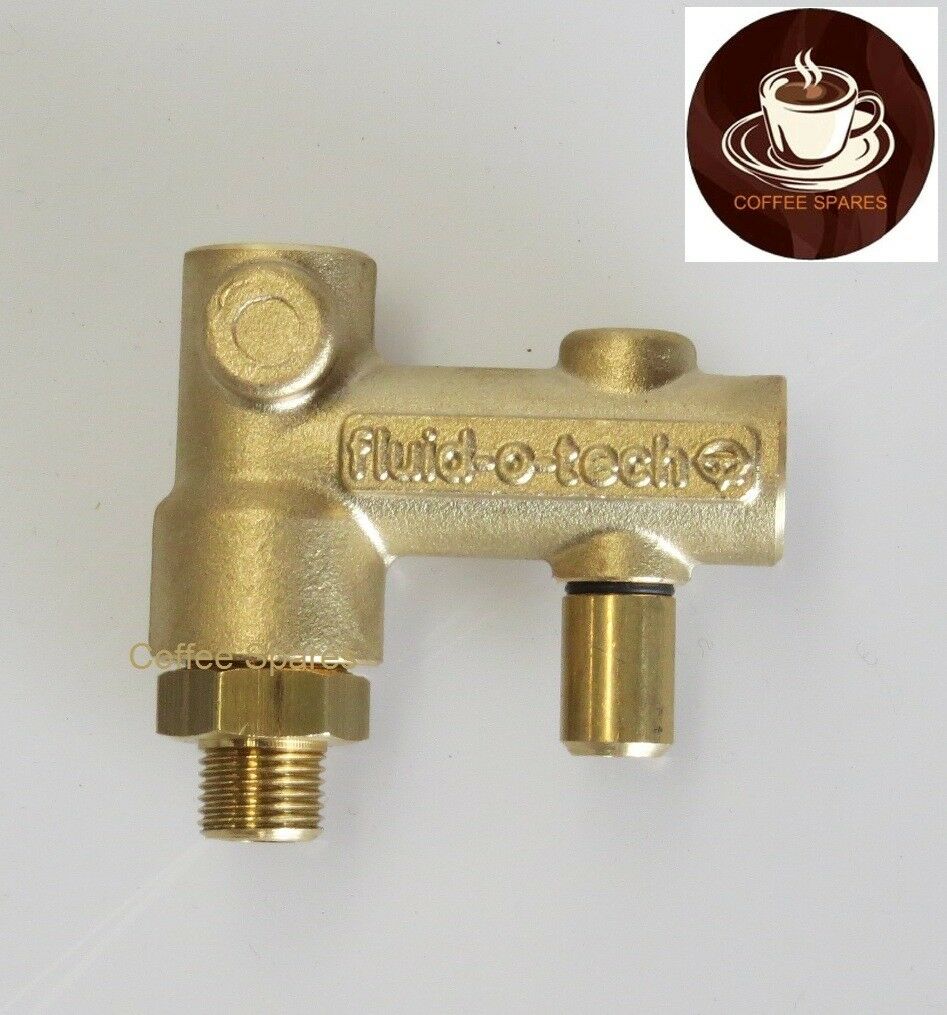 I got mine with matching adapter from: https://www.ebay.com.au/itm/174323702731
I actually previously installed a Breville bypass valve (https://outwestcoffee.com.au/index.php/product/breville-bypass-valve/) but it was a pain to adjust and started leaking after ~1.5yr
There are lots of other ones on the market too, any brass, adjustable “Over Pressure Value” / “Bypass Valve” with 1/8 BSP fittings should be fine really.
High Pressure Adapters Link to heading
I used a slightly odd assortment of fittings, it was a bit of a mix of parts I already had on hand. Feel free to mix it up yourself as you see fit.
* teflon tape (or espresso machine suitable liquid thread-seal)
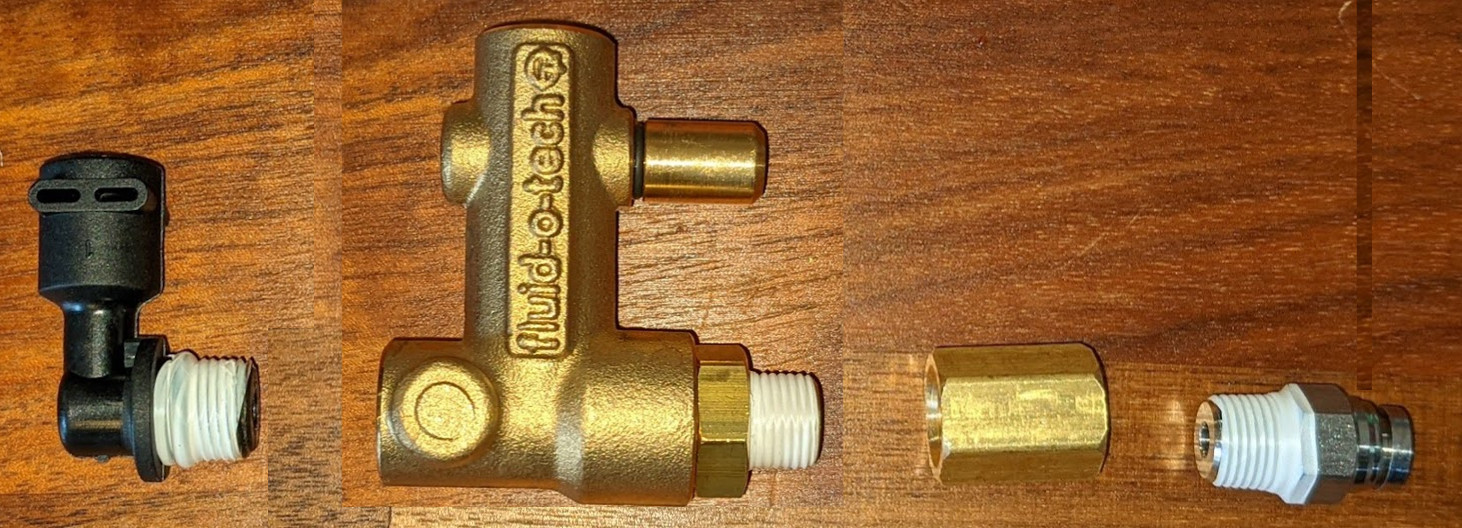
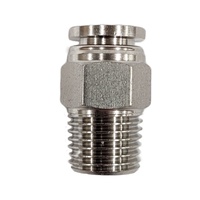
* 1/8 BSP to 4mm Jura right angle (requires matching jura o-ring and clip as well as 1/8" o-ring)
* 1/8 BSP F-F socket https://www.ebay.com.au/itm/263072149632
 * 1/8 BSP to 4mm 25bar push fitting (https://www.valvesonline.com.au/316-stainless-steel-push-fit-straight-union)
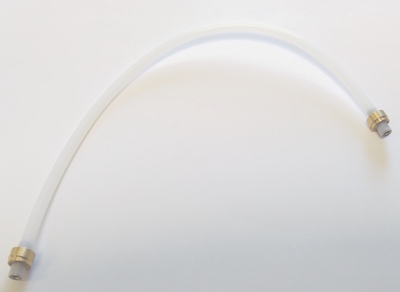
* 4mm PTFE pressure hose with jura crimps (https://outwestcoffee.com.au/index.php/product/pressure-hose-22cm/)
###Notes: Turns out I should have skipped the 1/8" to Jura fitting I already had and just bought a second one of the push fittings. These are typically used / sold as Pneumatic connectors, but as long as you get one rated at least 20bar / 300psi (most are only half this) then you should be good to go. I find them much easier to use than the jura connectors.
When using teflon tape, make sure you wrap it on flat / smoothly in the correct direction. If it’s the wrong direction it can become unwound as you screw in the fitting. Look up “teflon tape direction” for more guidance if needed. If your tape is wider than the fitting thread, make sure none “falls over” the edge of the thread into the pipe opening / where water flows - you don’t want the tape getting pulled off into the water flow.
Low Pressure Plumbing Link to heading
* Silicon Tubing. I bought 4x7mm (1 meter length) but I’m pretty sure I should have bough 5x8mm instead - mine is a little smaller than what’s used elsewhere in the machine.
* 5mm T Piece Plastic Hose Pipe Tube Connector (https://www.ebay.com.au/itm/270860547624) 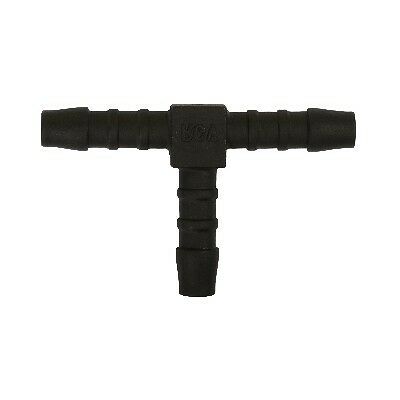 * small cable ties to strap the silicon pipe down onto the push fittings.
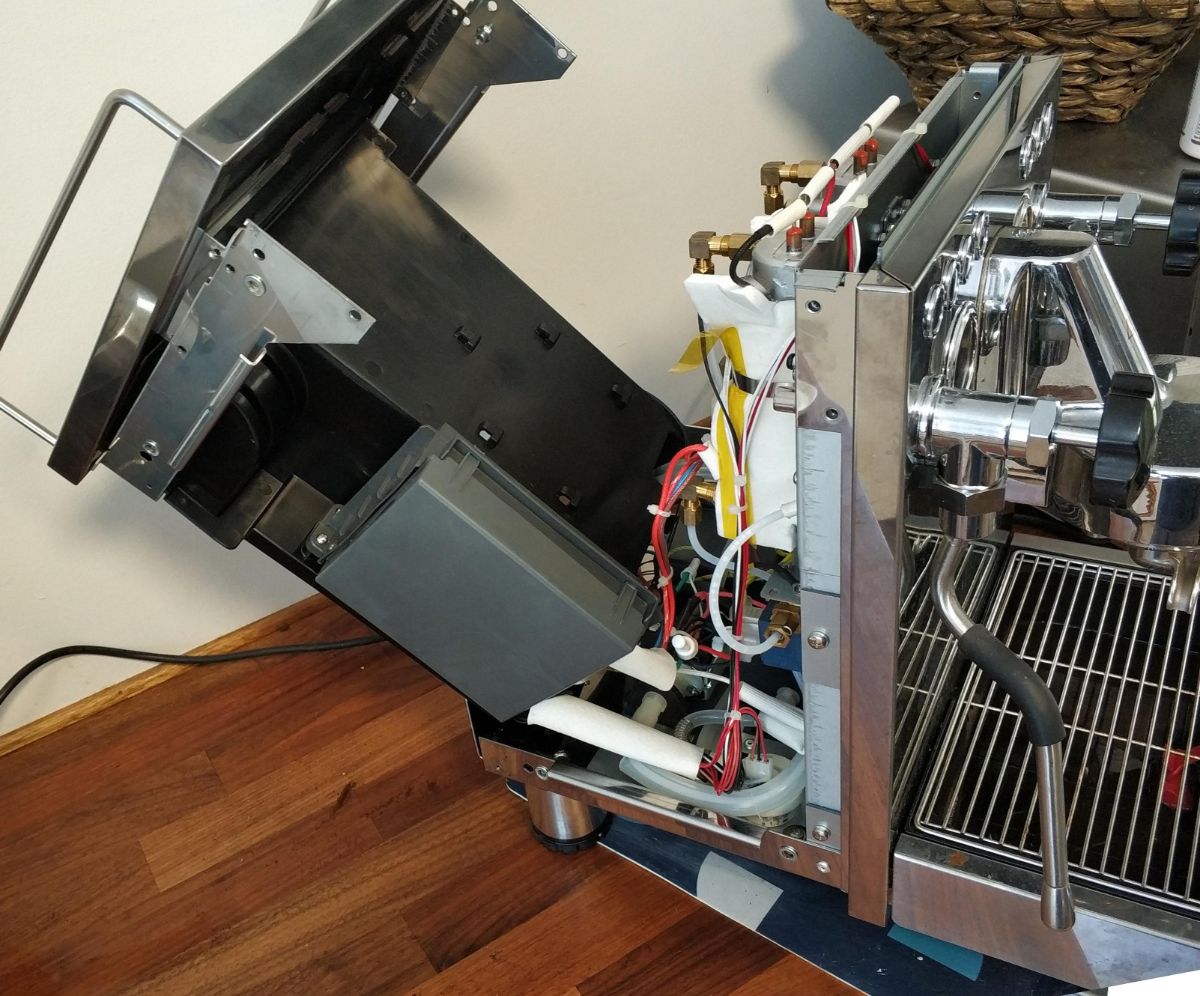
Disassembly Link to heading
You’ll need only a philips head screwdriver for this part, it’s a pretty straightforward machine to get into.
Take out the water jug and drip tray (might as well clean them while you’re at it).
Most important: **Unplug the machine from the power.**
Then start by removing the two screws on the lower back of the machine. Try not to get confused by the reflections in the panel - a stainless steel machine is hard to photo!
Put these aside in a safe place, note they’re ever so slightly different to the ones you’ll pull off inside shortly.
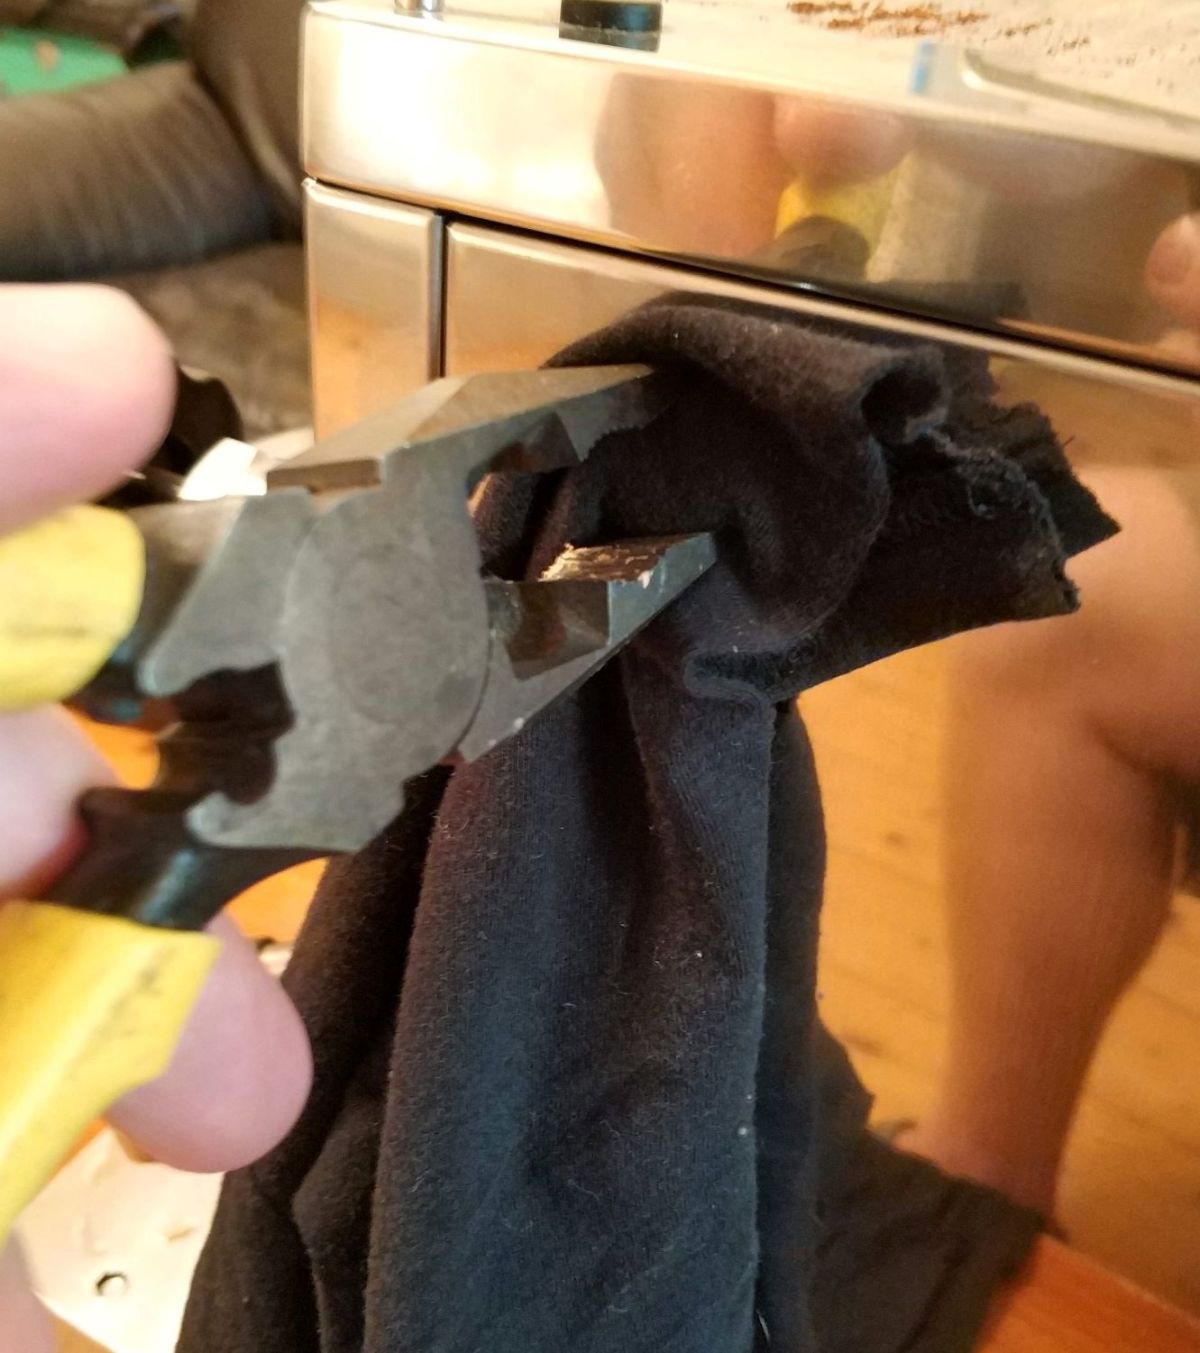
Now the 4 blobs on each side of the machine are also screws, covered with separate screw on caps. These caps can be removed without damage by covering them with a rag before gripping gently and turning anti-clockwise with pliers to loosen them. Then you can then unscrew them the rest of the way by hand.
Under the caps are the screws to remove
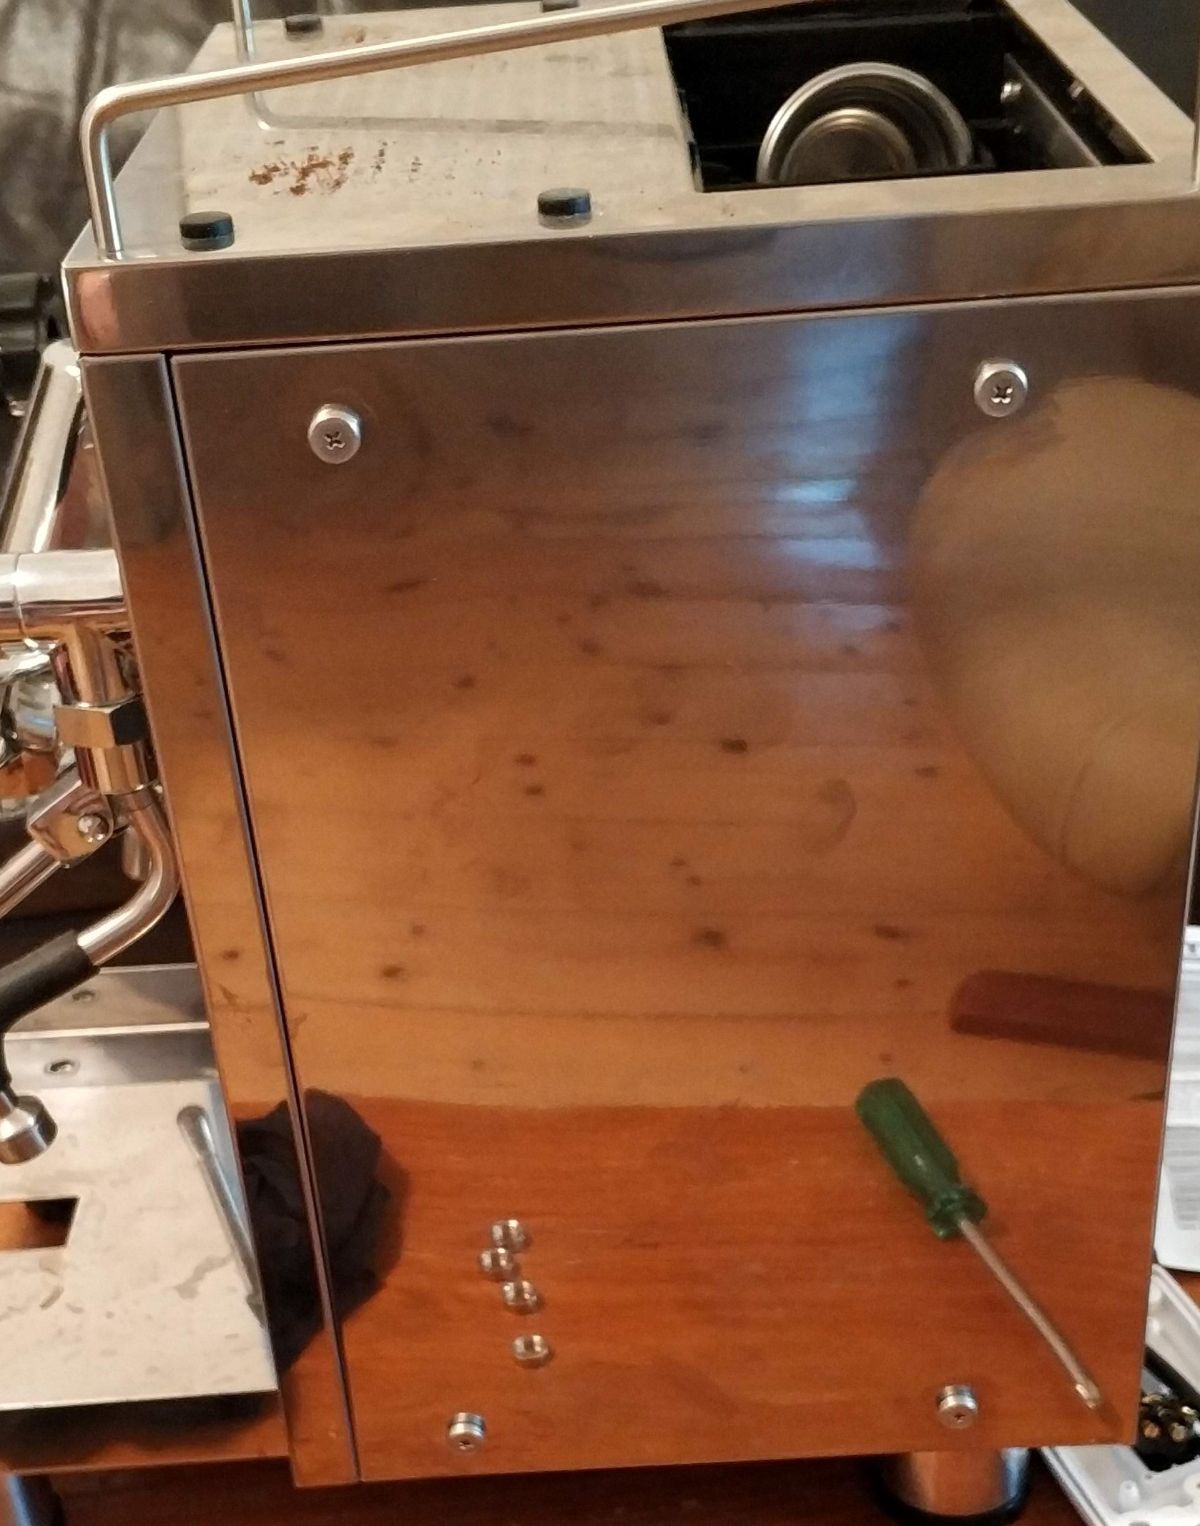
take all these all out and then both sides and back should basically fall off.
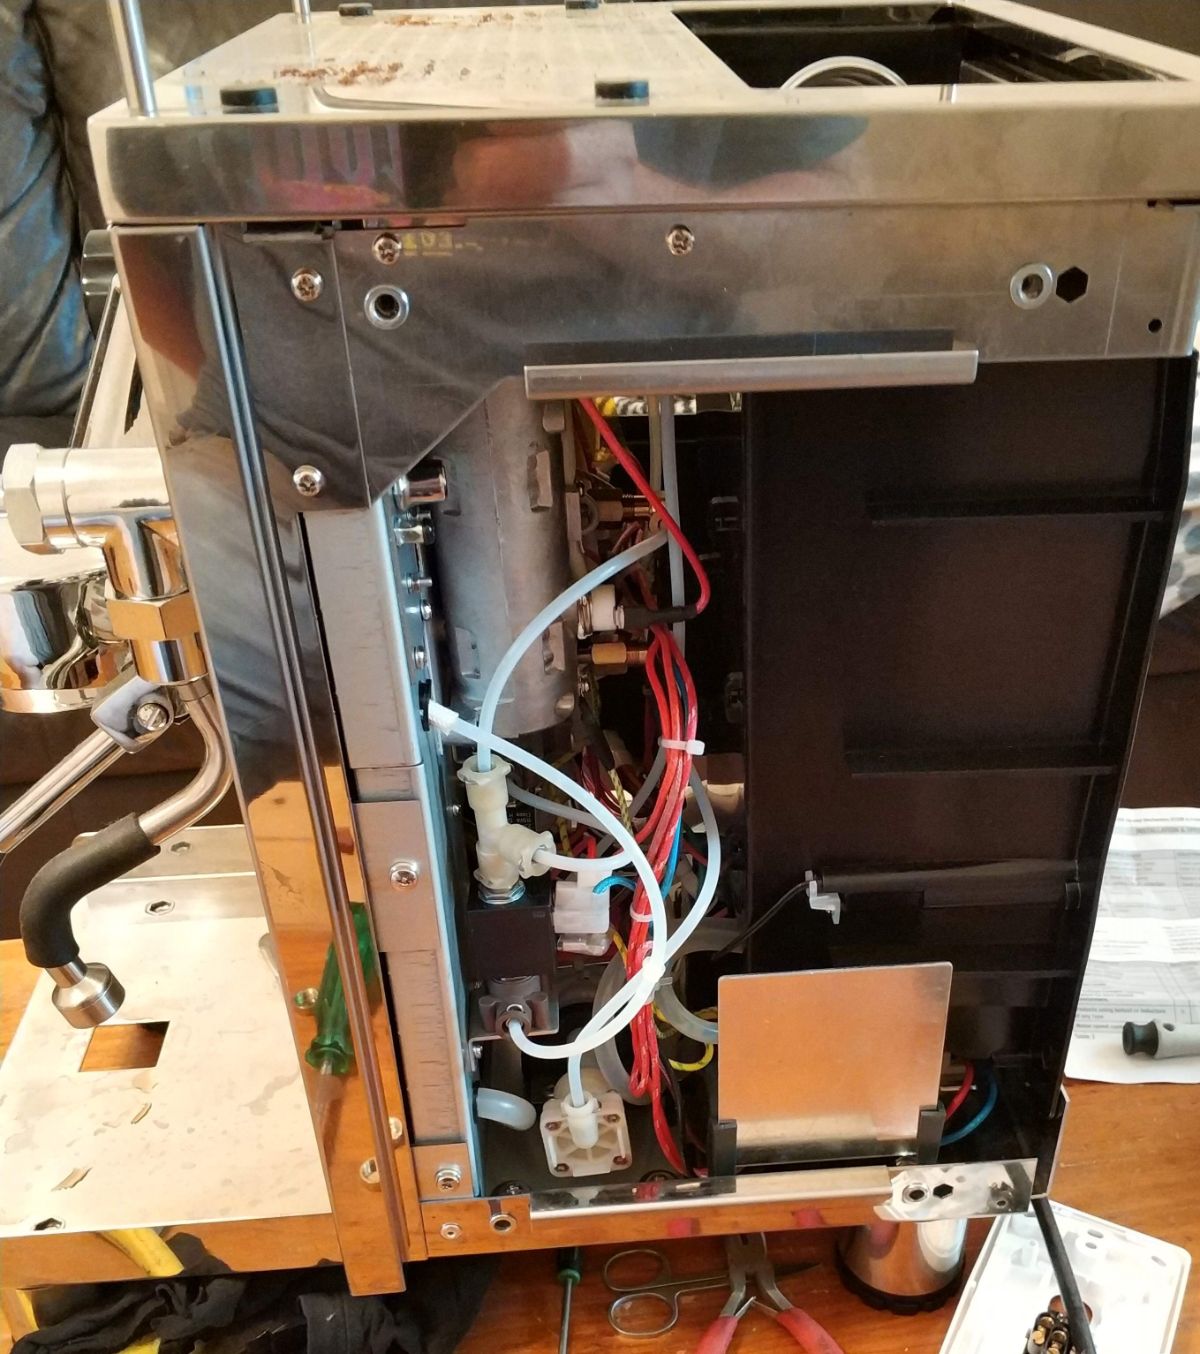
Next remove the 4 screws near the top on both sides
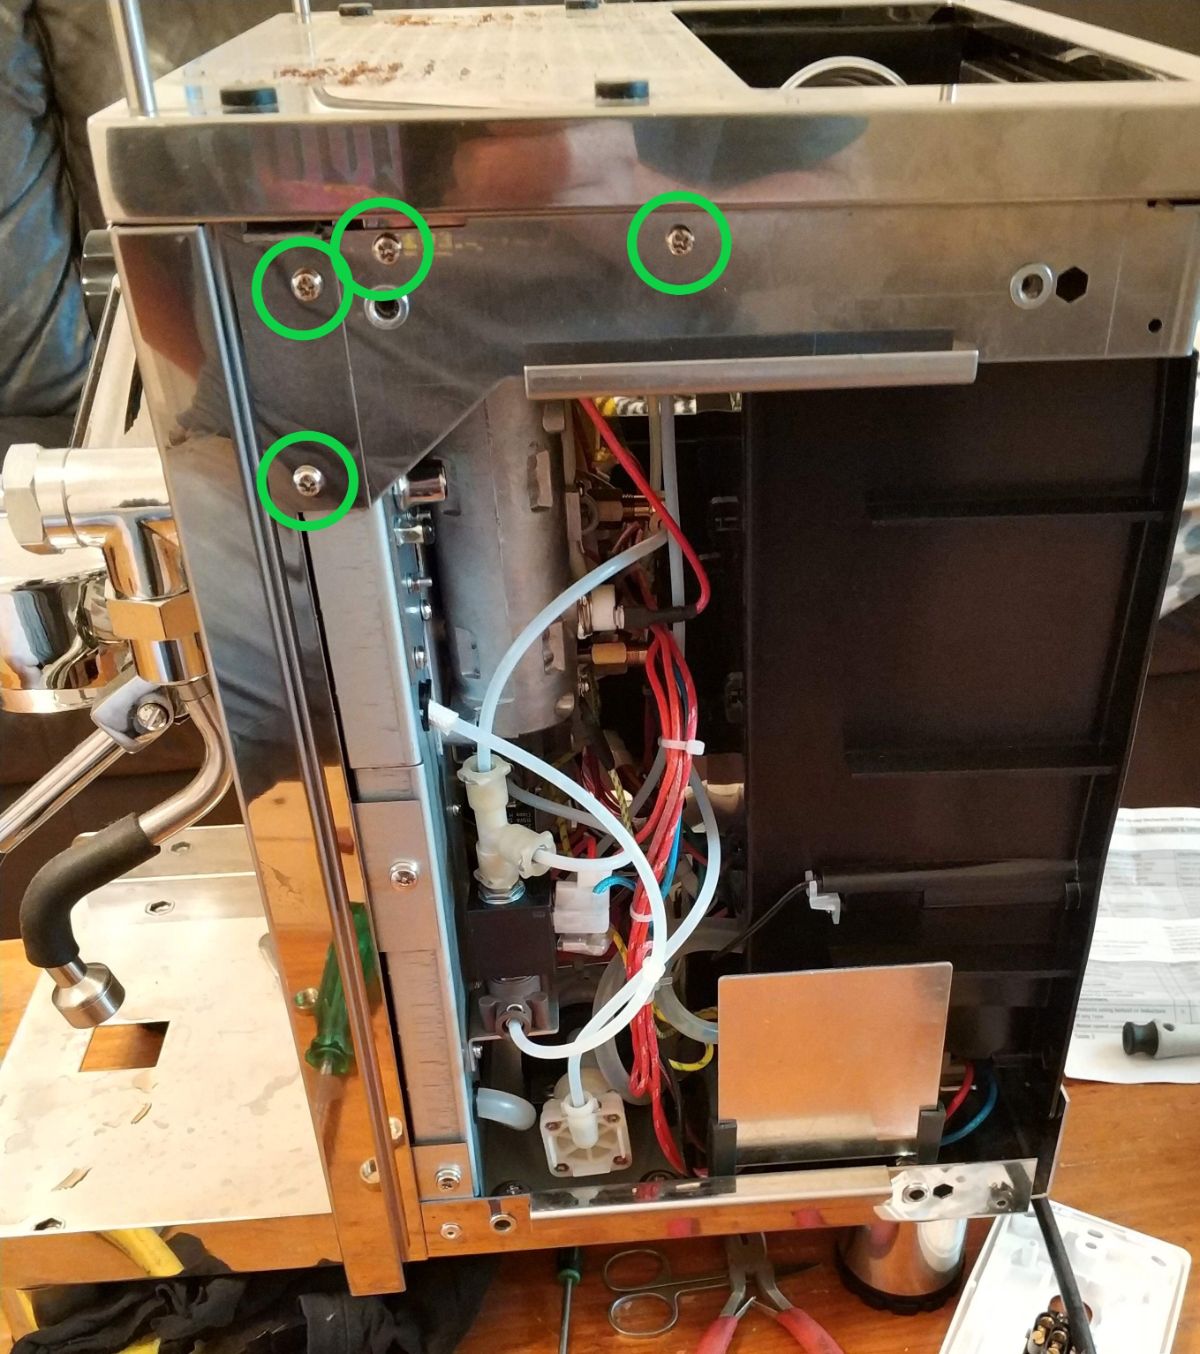
Take note of the screws as you pull them out, two are slightly shorter than the others. A good trick is to tape them next to / near the hole they came out of with some masking tape.
Then with some lifting and jiggling the top frame and water jug should lift and fold back on the wires and pipes. I suggest you find a wall or something to lean it on to not stress the connections too much.
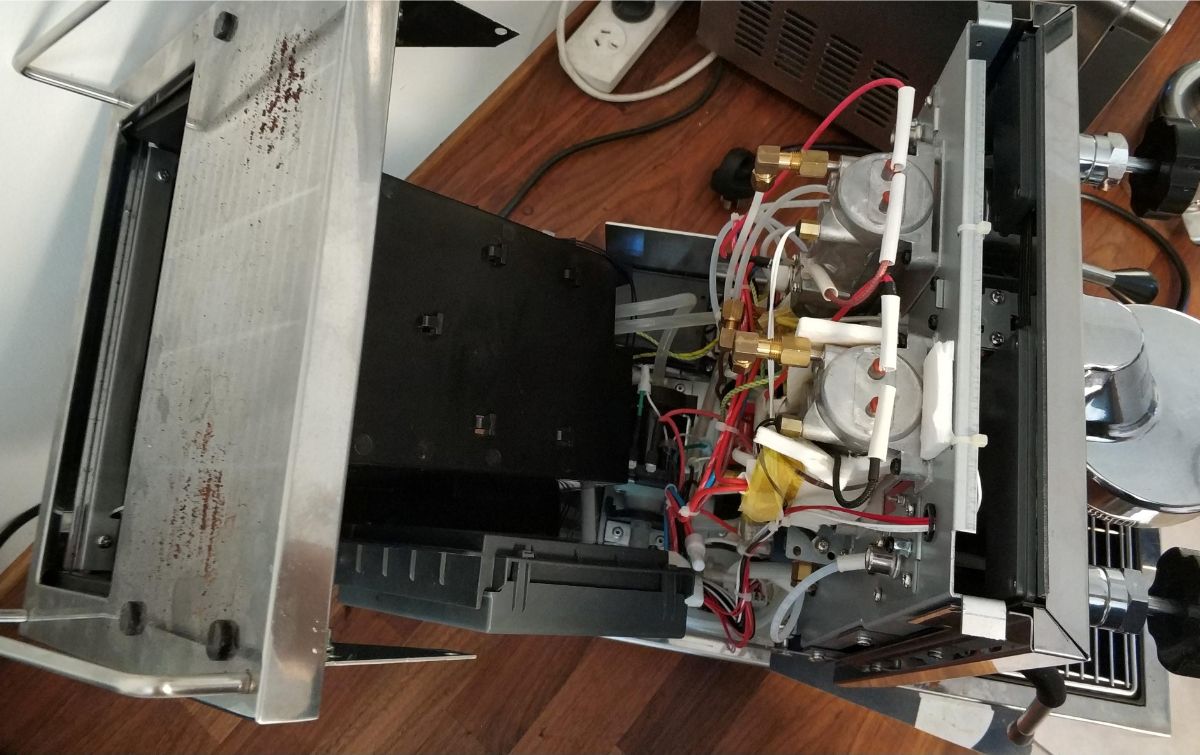
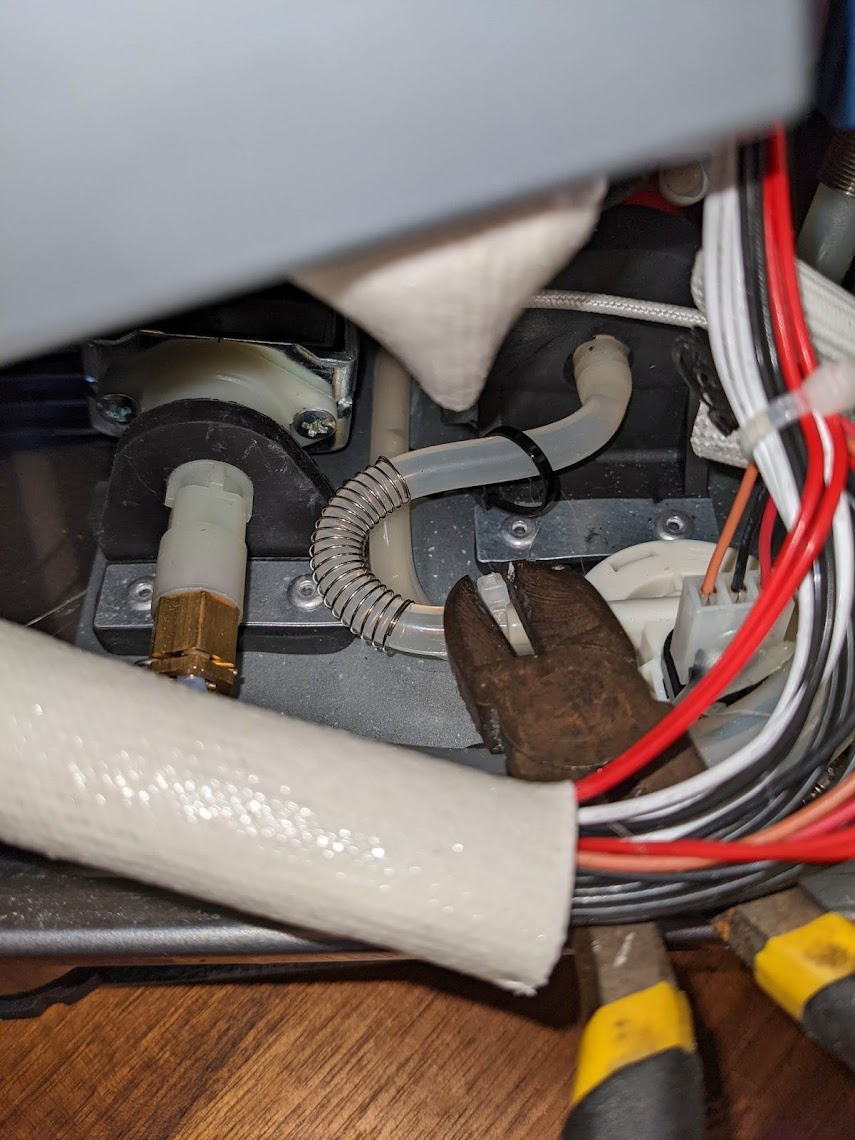
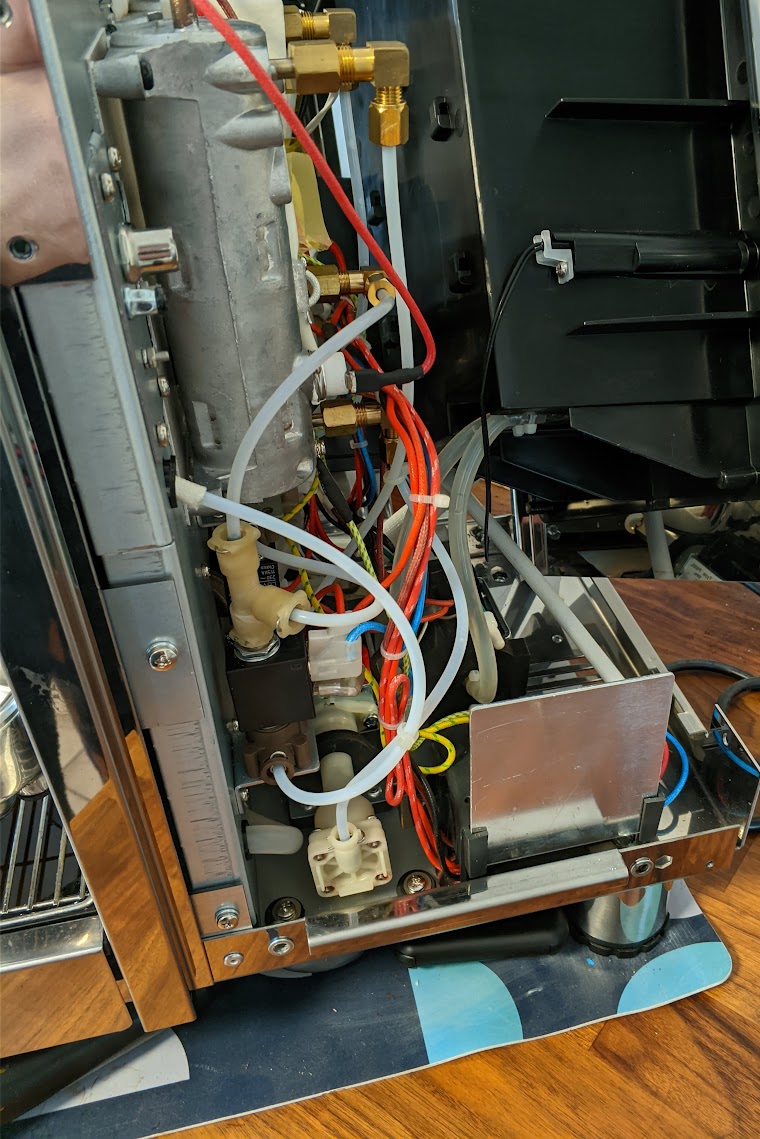
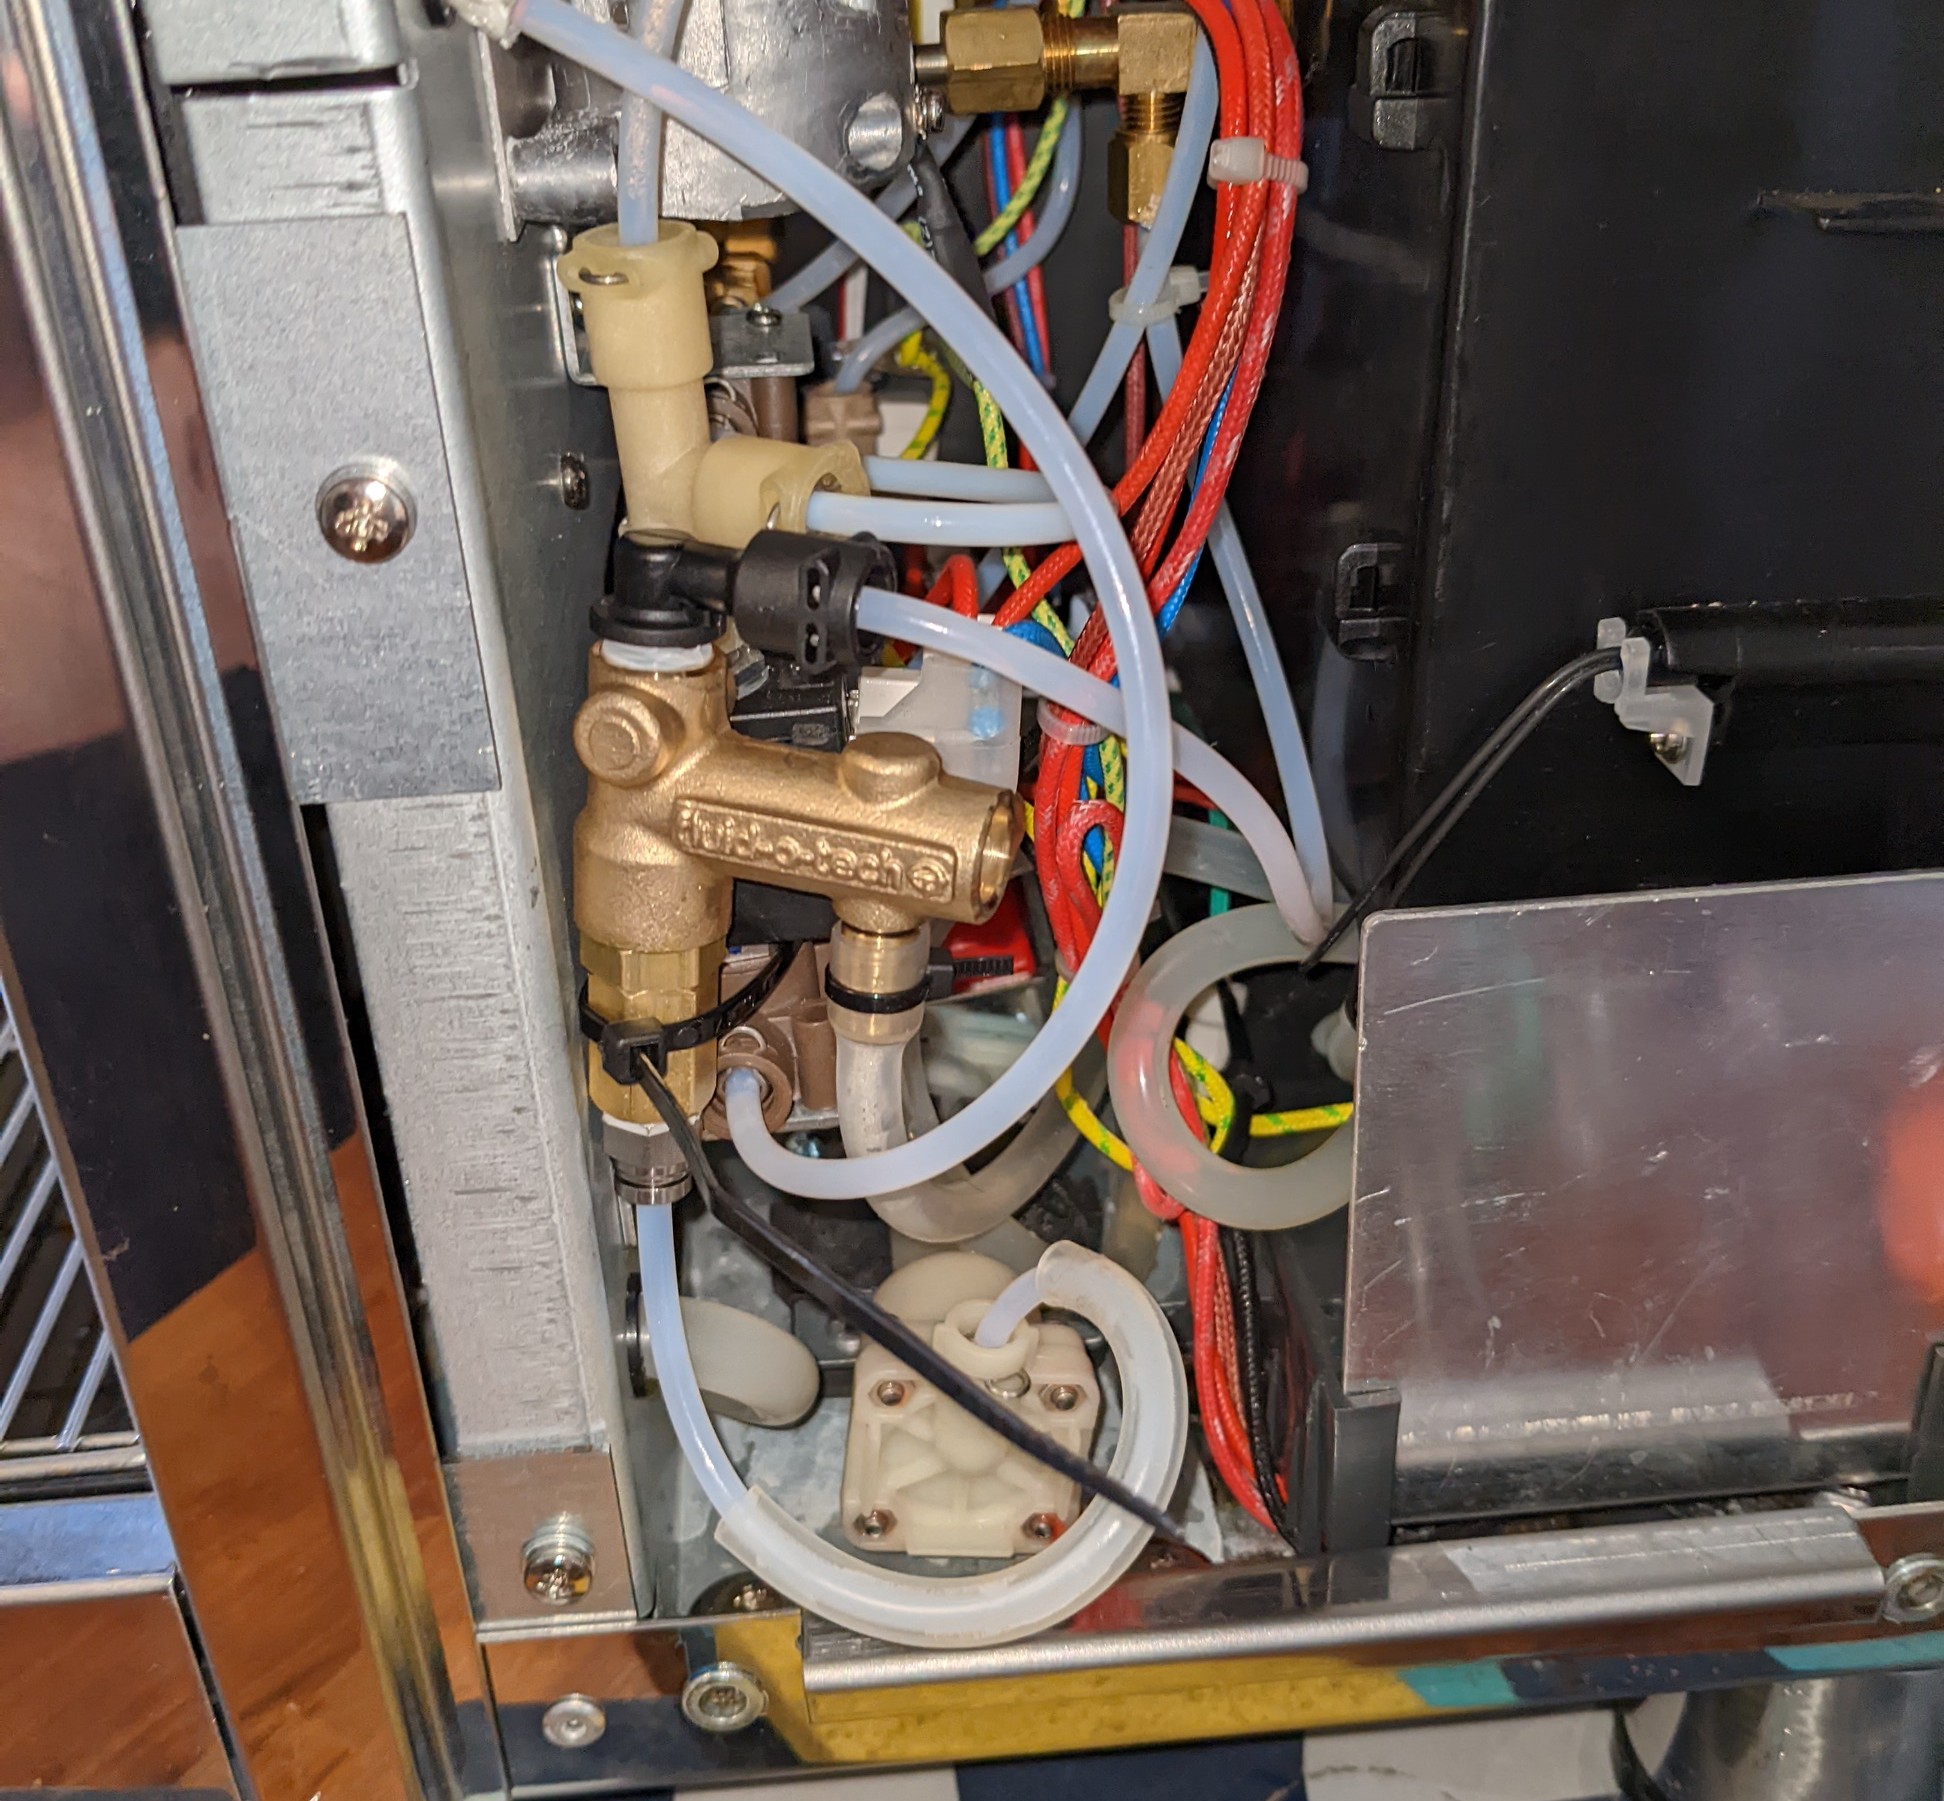
Now looking down inside it you should find the main pump closest to the front of the unit, mine’s red;
In that photo, the outlet of the pump is towards the top of the photo and has a noise damper directly attached (sort of flat square plastic thing) - you want to keep this! In my previous breville opv install I simply replaced the noise damper with the opv (they had matching inlet and outlet connectors) which worked, but the machine was significantly louder as a result!
The pump inlet is at the bottom of the above photo (silicon tubing) which goes to the flow sensor.
 Note the spring over the silicon tubing - this helps the tubing to bend smoothly and not kink, we’ll continue to make use of this later.
Installing the OPV Link to heading
While we’re on the low pressure side, we need to break into that connection between the pump and flow sensor. On my previous OPV install I plumbed the OPV low pressure outlet straight back to the water tank. After doing this, the dosed shot buttons were far less accurate than they used to be - whenever the pressure got above that opv threshold, some the water previously measured was being diverted back to the tank rather than through the group. So this time, I wanted to make sure that any bled-off water is fed back into low pressure side after the fluid sensor to preserve its accuracy.
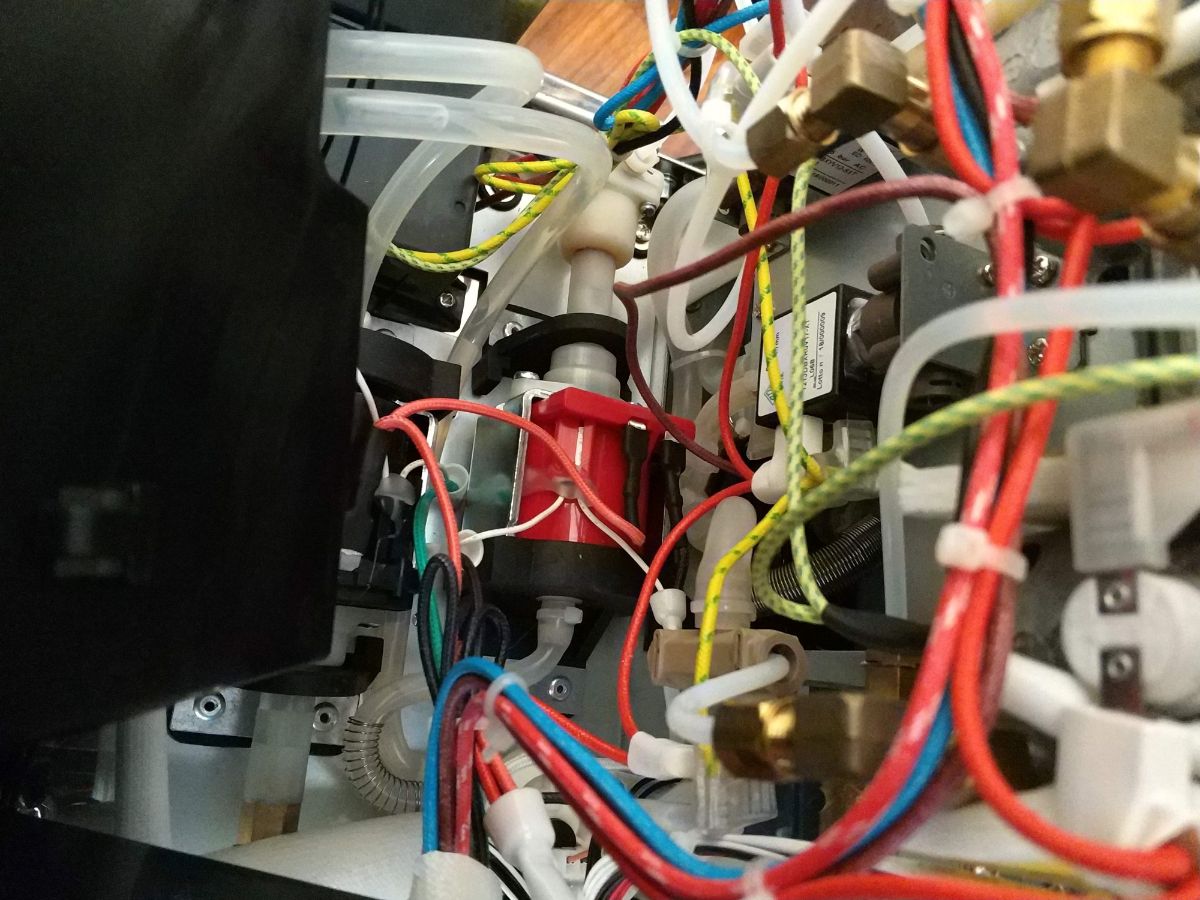
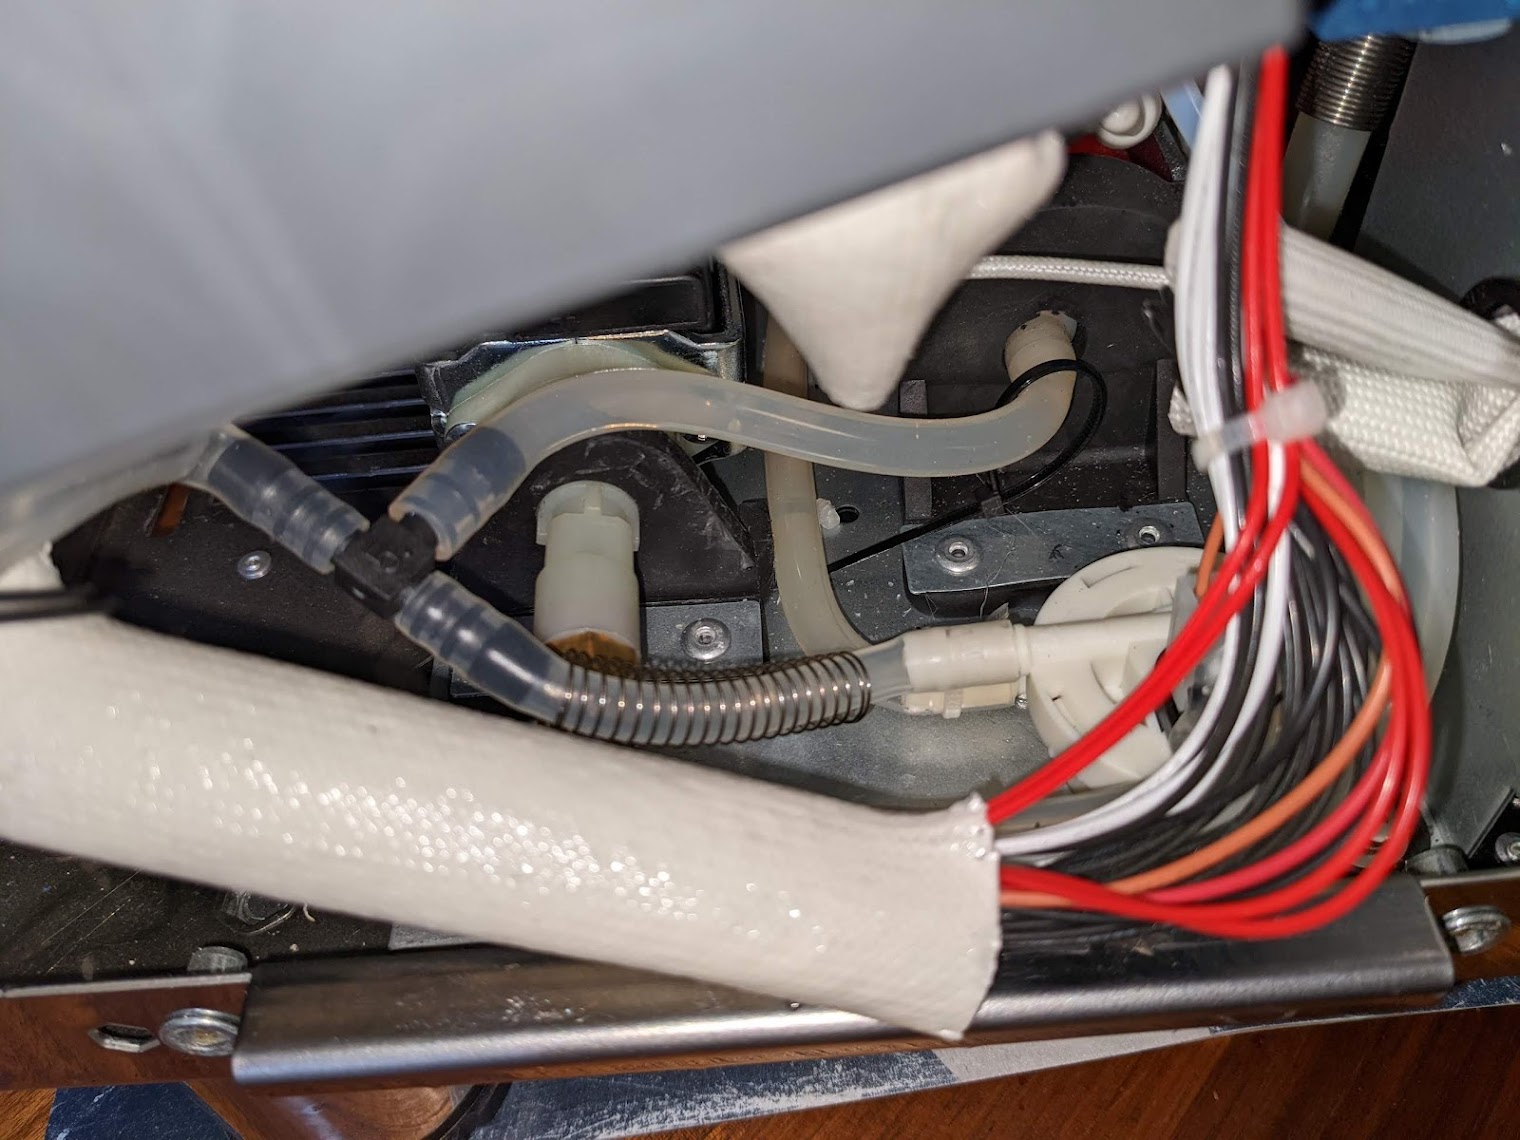
Carefully cut the cable tie on the silicon tube at the fluid sensor (next to the end of the spring in that photo)
 Then the pipe can be pulled / wiggled off the fluid sensor. You might want to jam some paper towel around it to catch any water leaking out.
Push that silicon tube onto the tee piece and cut a short length of the new silicon tube to go from the tee back to the fluid sensor.
 Keep the spring on the piece going to the fluid sensor else it can get kinked once routed.
A longer section of tube will be needed on the other outlet of the tee, you’ll want a piece that can reach out the other side of the machine.
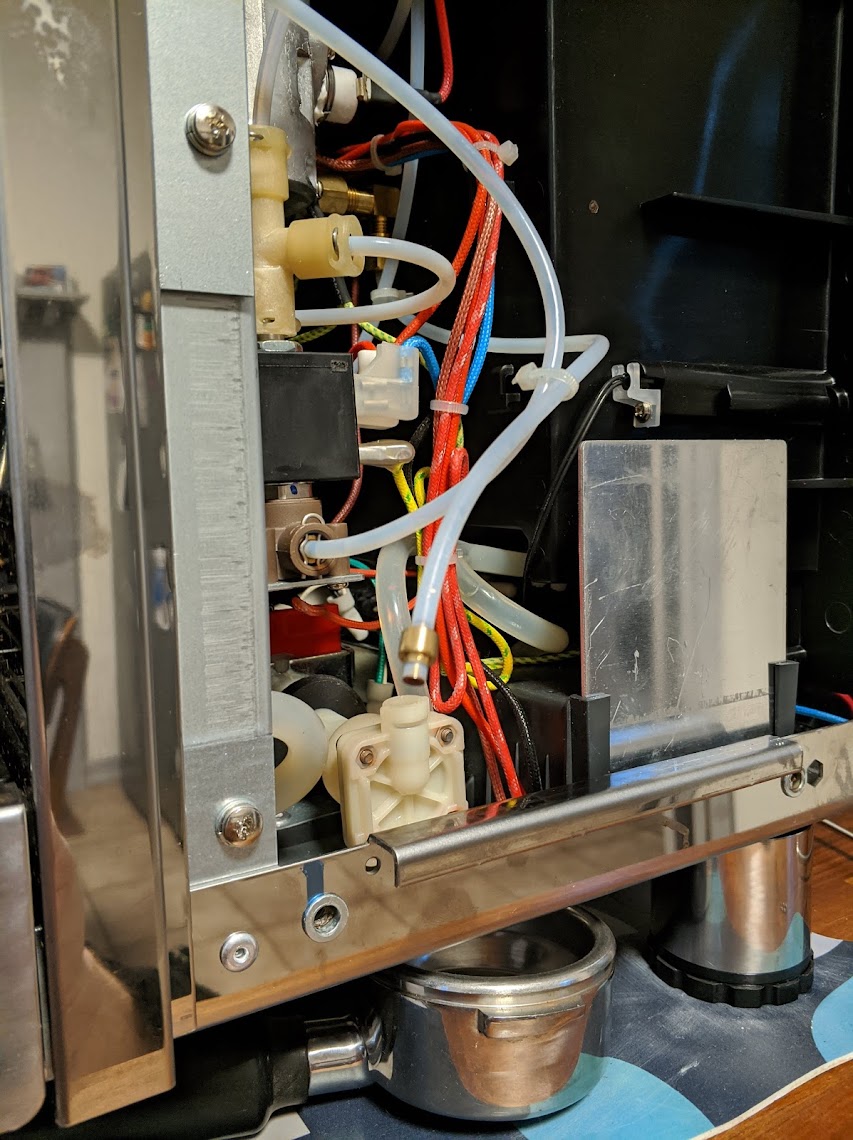
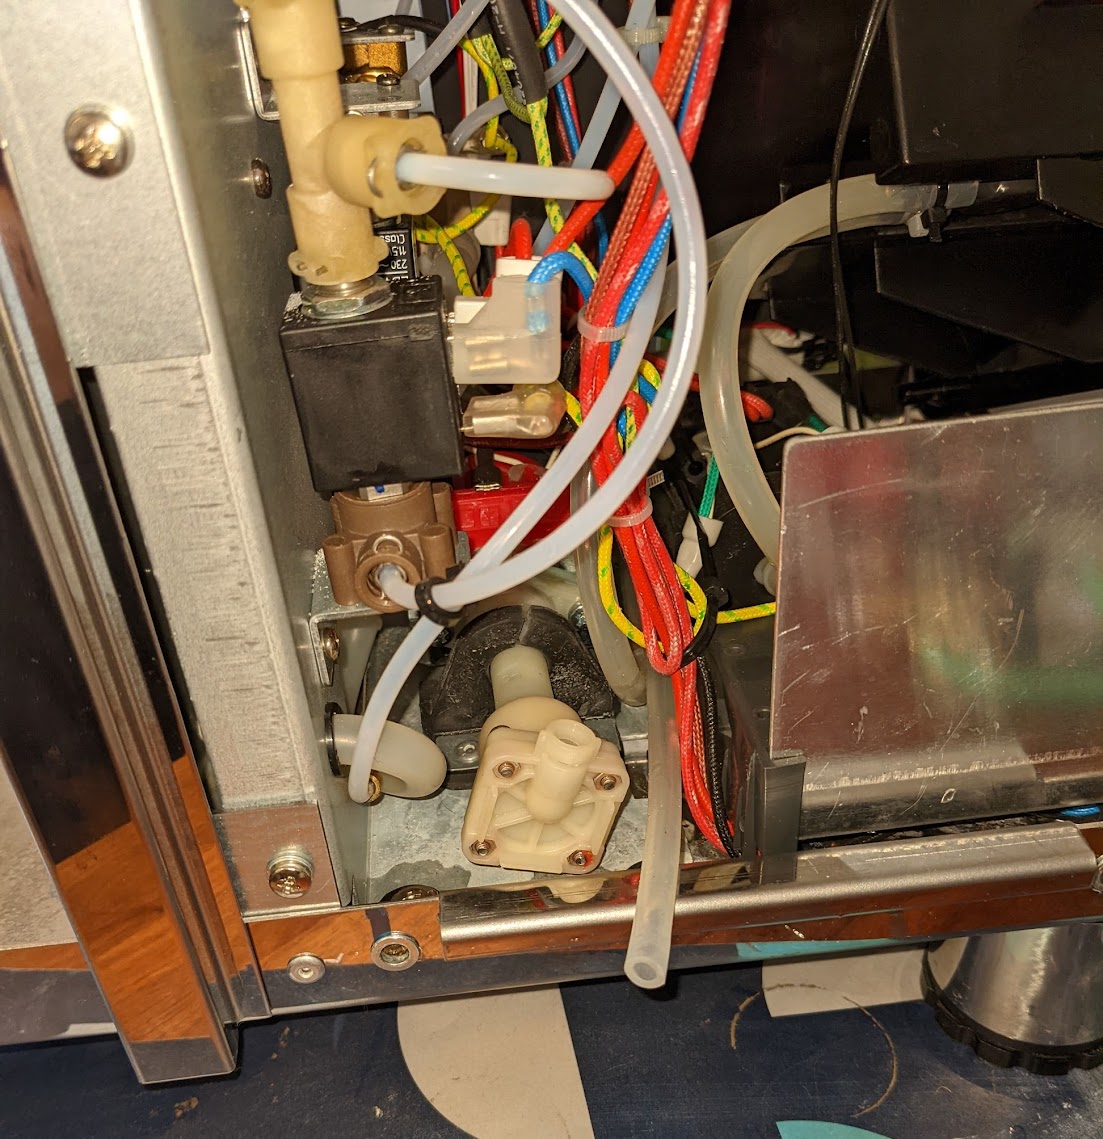
Then wiggle it all into place so it runs between the main pump and the steam pump beside it.
Now onto the high pressure side.
Start by assembling the fittings on your OPV. Basically you want to get 4mm PTFE hose connectors on both the high pressure inlet and outlet of the OPV.
Use appropriate thread seal and spanners to do up everything nice and tight.
The right andle jura adapter was clearly 1/8" BSPP (parallel thread) because it comes with space for the o-ring. However, I could not screw it all the way into the OPV… either the OPV outlet thread was tapered, or just not long enough, either way I just wrapped the fitting in tape and screwed it in as far as I could, and then a little bit more, and hoped it’d seal. In hindsight I probably should have swapped it and the push fitting over.
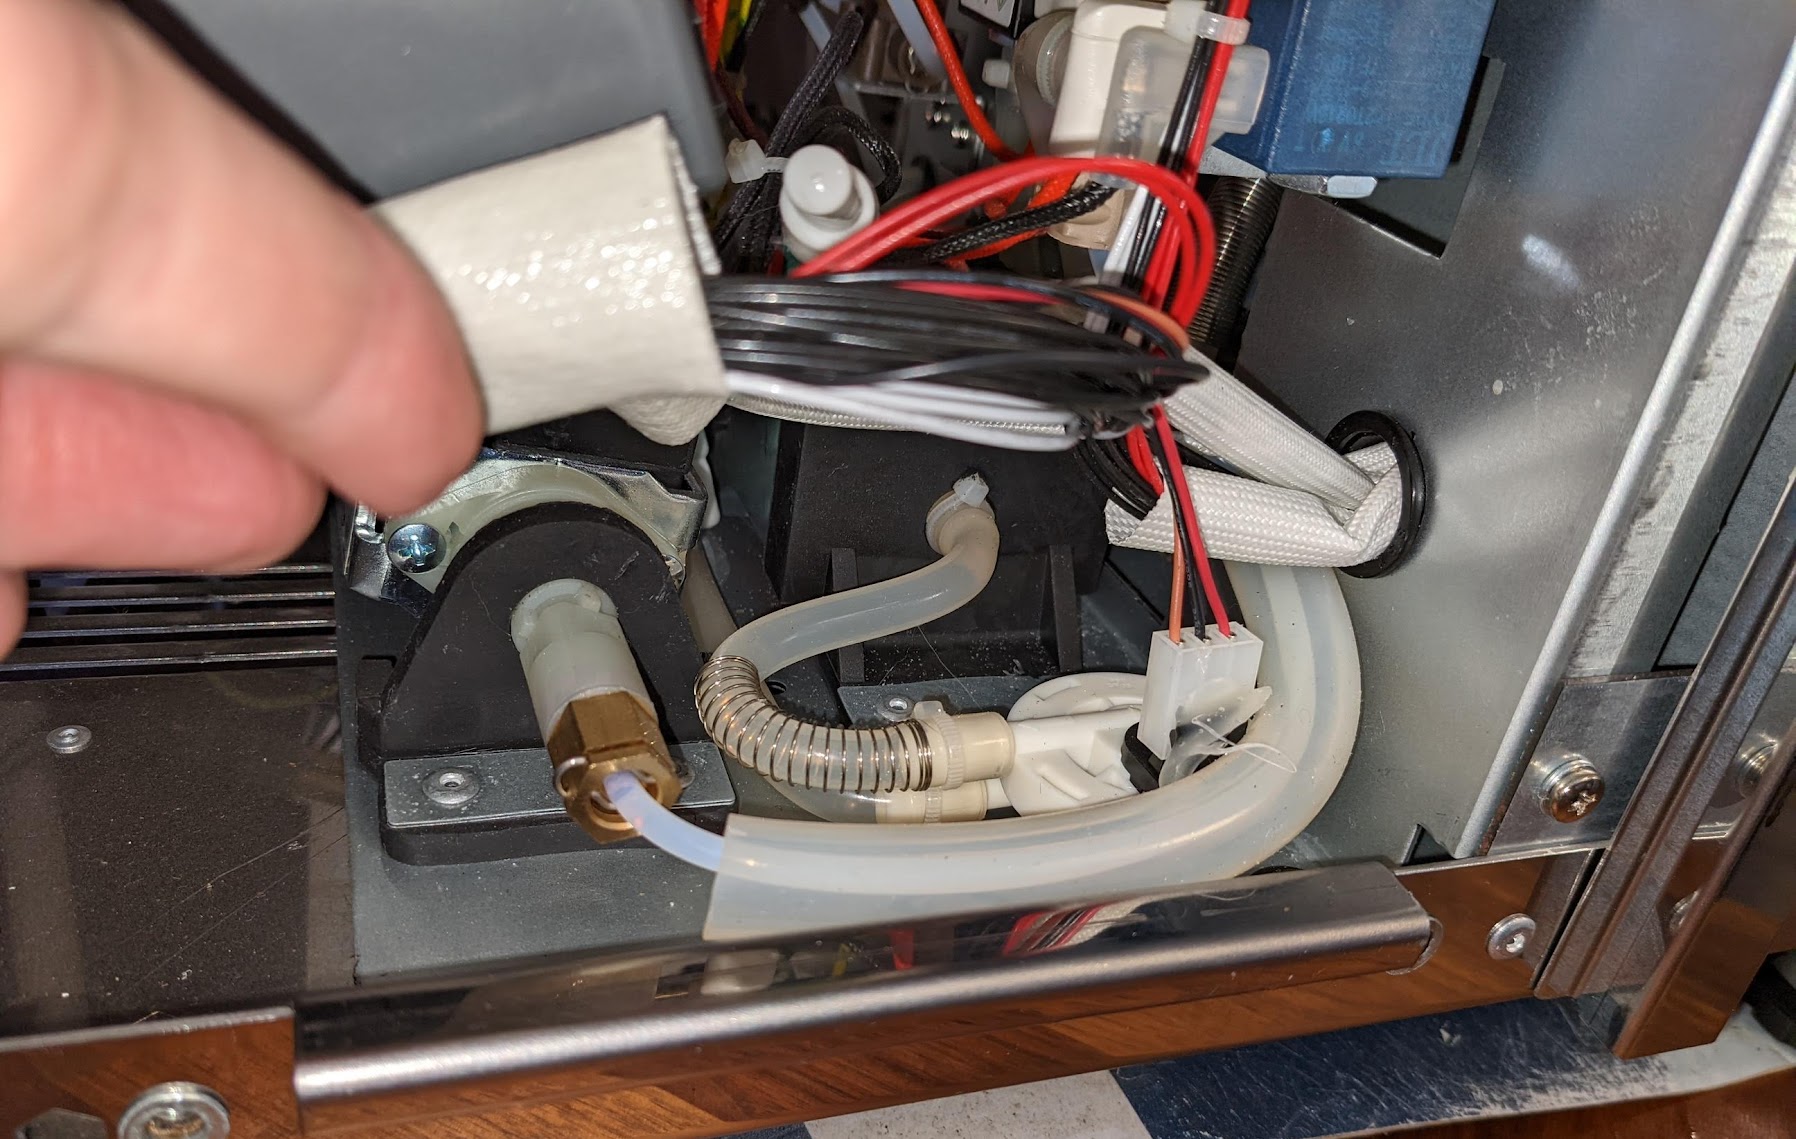
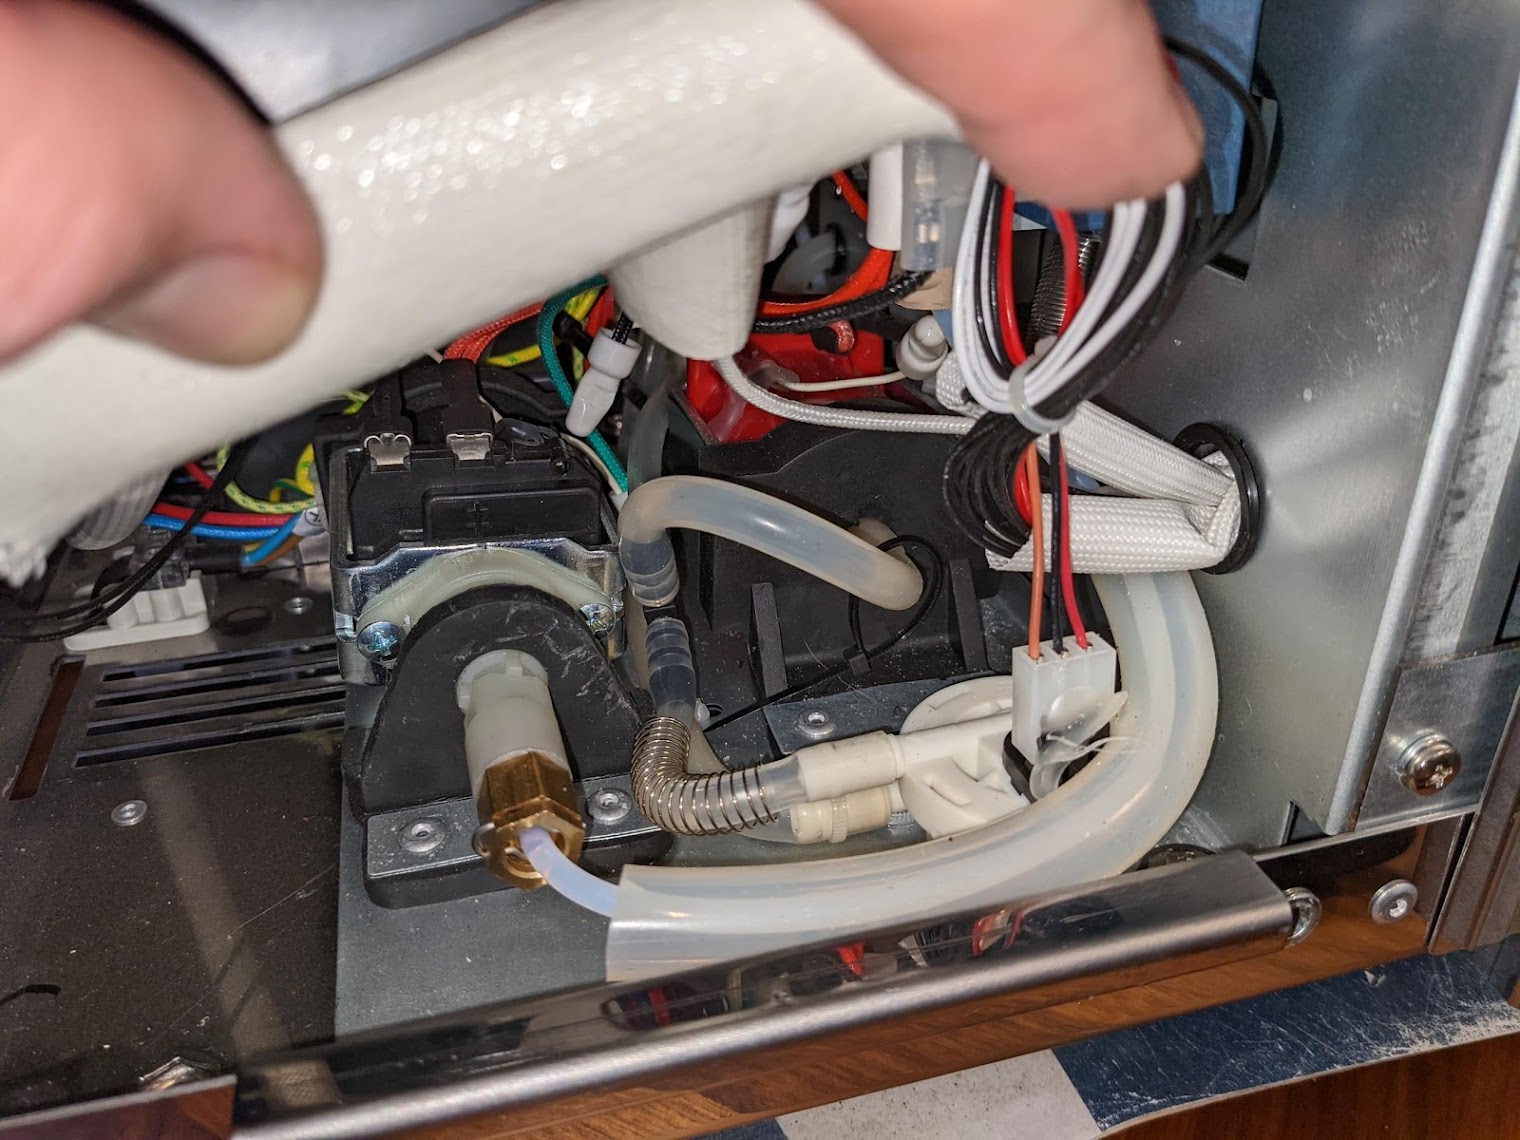
Back over on the outlet side of the pump
We want to disconnect the hose from the jura connector on the outlet of the noise damper (lower left corner)
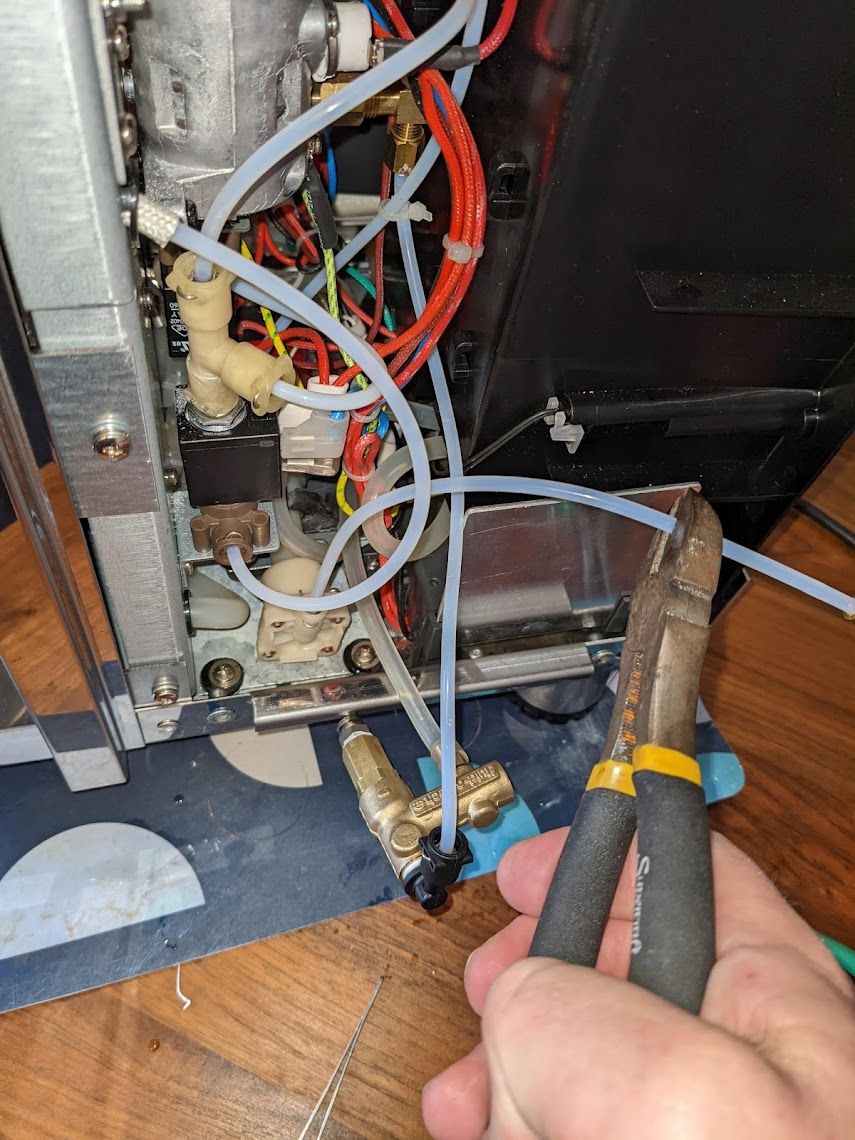
Looking closely at where the pipe goes into damper, you can see a metal clip holding it in
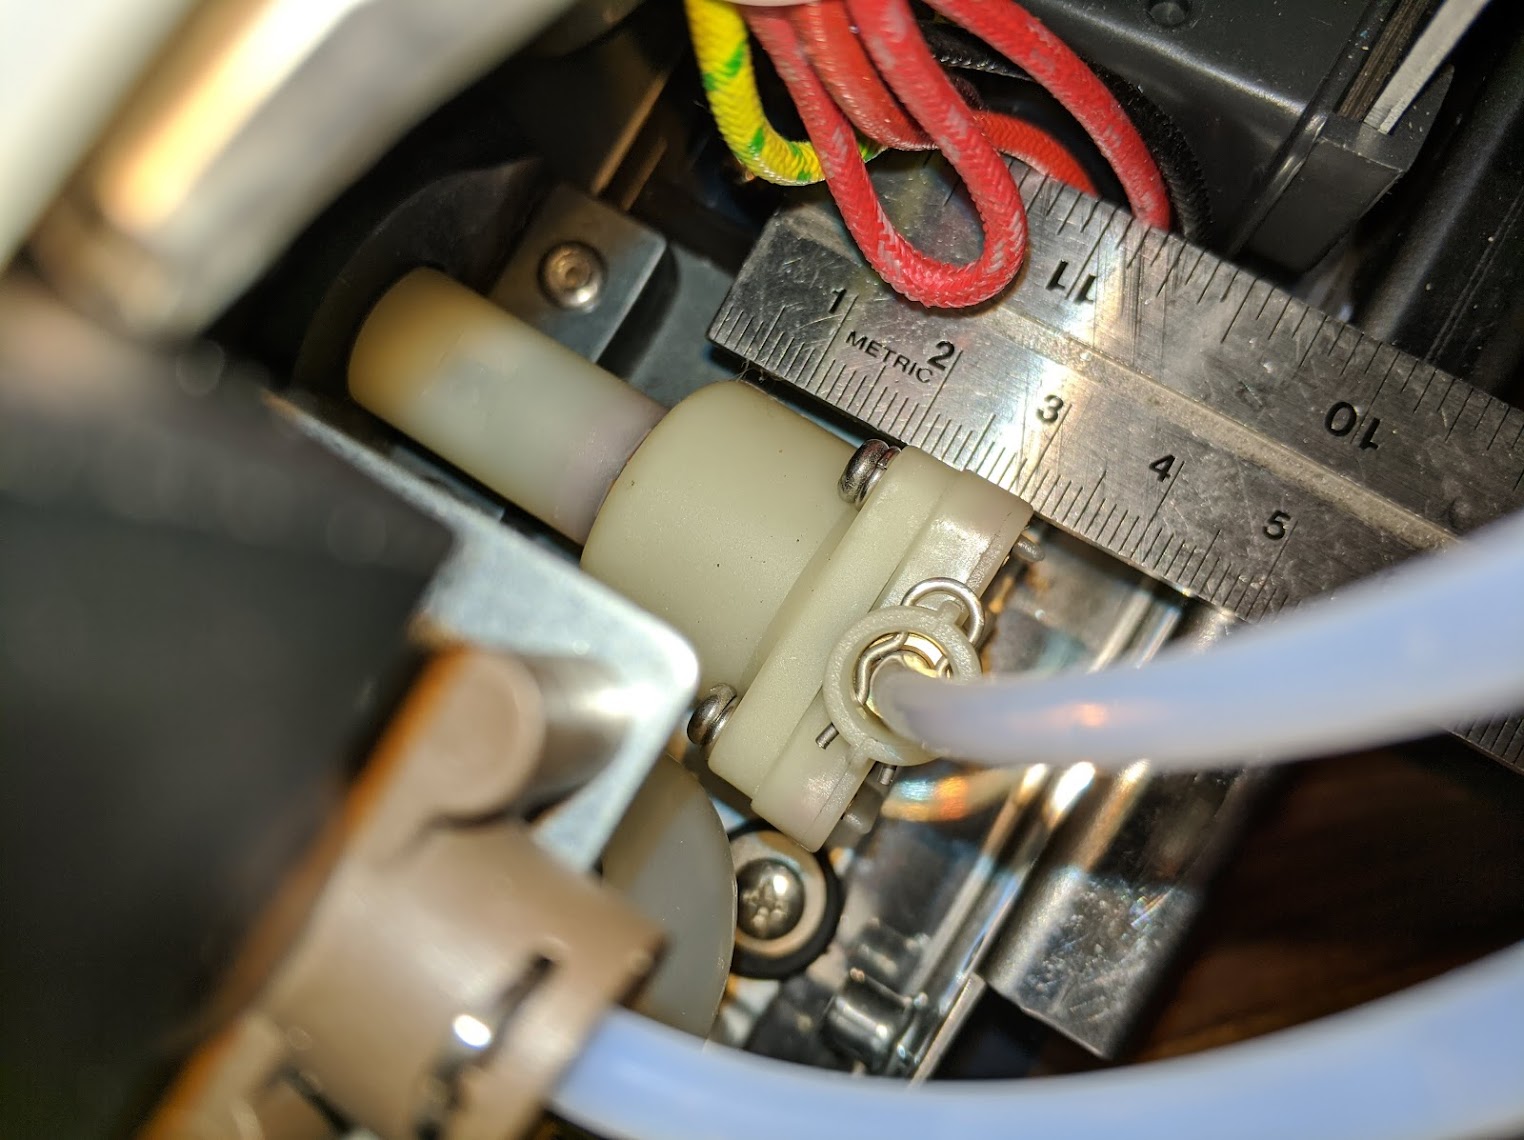 With pliers, grap the clip by the looped side near the ruler in that image and pull it out.
Once the clip is out, the pipe can be pulled straight out (with a bit of wiggling)
We will install the OPV in between the noise damper and this pipe shortly.
First though, make sure the new low pressure pipe has been pulled through so it’s routed cleanly through the machine, out beside the noise damper.
The low pressure pipe can be pushed onto the bleed outlet on the OPV.
The high pressure pipe that’s just been pulled out of the noise damper shall be connected to the high pressure outlet of the OPV assembly.
I found it easiest to push the jura o-ring onto the end of the pipe first so it’s against the collar, then push that into the fitting. Once it’s in far enough, the clip should fit through easily.
The new 4mm pipe I bought had the correct jura collar on it so I inserted one end of that back into the noise damper.
The other end of this pipe needed to be cut off as the push fitting doesn’t need the collar.
OK I should have used a sharp knife rather than side cutters, I needed to clean up the end a bit after this.
Then just push the pipe into the push fitting and you’re good to go

Right, at this point it’s all in one piece ready to test.
Leave the fitting sitting out of the machine like this so that if it leaks, it should be on your bench and not into the machine electronics.
Carefully sit the rear section of the machine back into place, making sure it’s all stable. Double check there’s no tools inside the machine and everything is clear of the electronics. Put the water tank back in and plug the machine into power. Don’t go anywhere near the inside of the machine while it’s like this!
Turn it on, let it warm up. Put in a blank filter and pull the lever to start it running, carefully watching all the fittings and be ready to pull the power plug out if water goes everywhere.
I’m my case there was no water spraying around which was a positive, but the pressure was only getting to 6.5 bar.
Bring out the flat blade screwdriver and adjust the OPV half a turn. 7 bar. Couple of turns later and it solid on 9bar… and now there’s water beading out between the fittings on the OPV and also down the back of the noise damper.
Tightening all the fittings a touch on the OPV thankfully stopped that leak.
I pulled the hose back out of the jura fitting on the noise damper to inspect. I think the o-ring might have got it of whack a bit. I carefully reassembled it again and it didn’t seem to be leaking anymore. Success!
So now to physically install the OPV somewhere.
I had to twist and wiggle the hoses a bit to find somewhere I could strap the OPV to without destroying or resizing any of the hoses.
Eventually I decided that cable tie-ing it to the side of an existing valve behind the front panel was the best solution.
The high pressure hose from noise damper to OPV was threatening to bend out towards the side panel, which I was worried would cause loud vibrations during use. To mitigate this I cut some more silicon tubing and pushed that over the pipe. This helped to smooth out tight bends in the pipe and also means there’s some soft padding to take out vibrations. It seems to work, the machine is still nice and quiet during use (compared to most vibe pump machines).
Machine reassembled the rest of the way, time to make coffee. Fresh beans, nice and fine, yep the shot pulls much better - pressure topping out at a nice steady 9 bars.
I’m calling that a successful finish to the job. I guess time will tell how much difference it makes to my coffees!